
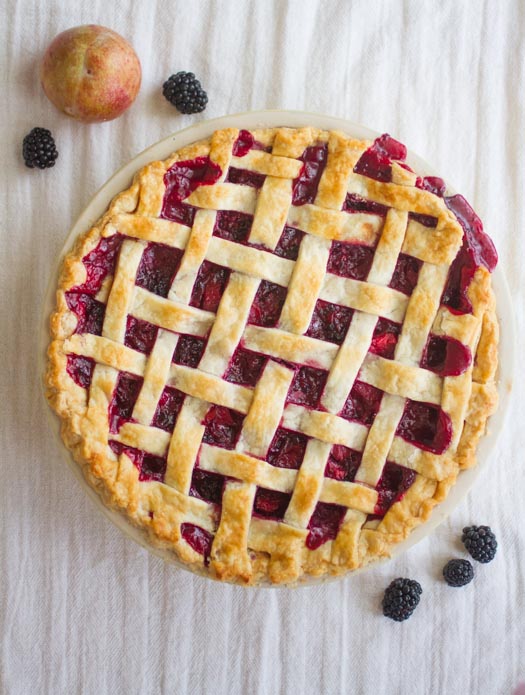
– This easy pie crust from scratch is almost un-screw-up-able. –
Pies are a year-round pastime. Whether you’re making a fresh strawberry pie in June, a savory buttermilk and tomato pie in August, or even a delicious-but-morose-sounding Amish funeral pie in April, there’s no time of year that people don’t make pie. But during the months of November and December, pies seem to explode out of every kitchen. Home bakers go into pie hyperdrive and all varieties of pumpkin pie, pecan pie, and chocolate pies (or awesome hybrids like this chocolate pecan pie) start stepping out like RuPaul.
What do all pies have in common? Crust, of course. And that’s exactly where most would-be pie makers fall short. Pie crust is generally a really simple recipe – with just flour, fat, water, and a little salt – but as with most simple recipes, how you treat that short list of ingredients is super important.
Making An Easy Pie Crust from Scratch
Making pie crust is easy, for sure, but as with most things in baking, there are a few caveats. Because there are so few ingredients, you can’t hide bad technique behind fancy flavors or other distractions. If you want to make a perfect pie crust from scratch, it’s all about patience.
Here are a few important tips for making a perfect easy pie crust from scratch, every single time:
- This is the cardinal rule of making a pie crust from scratch: Make sure your fat is always cold. ALWAYS, with no exceptions. This means it stays in the fridge until you’re ready to use it, and no dawdling, poking, wondering, or staring off into space while either your fat or your crust are sitting on the counter. Soft fat or room temperature dough = a serious reduction in flakiness. If it gets to the point where you even begin to wonder if your dough is too warm, that’s your cue to wrap it up and put it in the fridge for half an hour.
- You can make pie crust with many different fats: butter, lard, shortening, even cheese in some cases. My go-to mix is a 50/50 ratio of butter and lard, though all-butter is a great way to make a crust, too. Crisco makes for a very nice crust indeed, but it also makes both Baby Jesus and your cardiologist cry.
- While you can make your easy pie crust from scratch in a food processor or stand mixer, you risk overworking the dough if you let it process or blend for too long. This can cause your crust to shrink when you bake it and lose its tender, flaky texture. This is why I recommend mixing the dough by hand, using a pastry blender, which would make it incredibly hard to overwork the dough. If you want to go ahead and mix your dough electronically, just make sure you only pulse it a few seconds, just until the dough comes together.
- Pie crust will always shrink during baking unless if you let it chill overnight. This is because the gluten in the flour gets all wound up, like a cat wiggling its butt getting ready to pounce. The only way to keep your dough from shrinking in the oven is to let the proteins relax by giving it a nap in the fridge. In an ideal situation, this means that you need to let it rest one full night after mixing the crust, and another full night after rolling it and placing it in the pie plate.
- Again, because it bears repeating: Even if a recipe, like the one below, says to only rest the dough for one hour, let it rest overnight if at all possible. A one hour rest is better than nothing, and in this busy world many recipes are made with time management in mind – but if you’re concerned about your crust shrinking in the oven, letting your dough rest overnight is your best bet.
- After tucking the dough into the pie plate, don’t trim the excess crust from around the edge until after it’s rested overnight. This will allow for some leeway with shrinkage while is rests.
- The edges of a pie crust always cook the fastest, which often leads to edge getting too dark (or worse, burning). When I blind bake my pie crust I wrap the edges in foil to protect them from the heat, then remove the foil halfway through the baking process. I also do this while baking the crust. Burnt pie edges are a bummer!
Super Easy Pie Crust from Scratch
Ingredients
- 1 1/2 cup all purpose flour plus more for dusting
- 1 teaspoon sugar
- 1 teaspoon salt
- 1 cup cold unsalted butter cut into 1/2-inch cubes
- 1/4 cup ice-cold vodka (or ice water)
- 2 pounds of pie weights (or dried beans)
Instructions
- Preheat the oven to 375°F (190°C). In a large mixing bowl, whisk together flour, sugar, and salt. Add butter, and using a pastry blender, cut the butter into the flour until you've got a coarse sandy texture that looks like rolled oats.
- Sprinkle in half of the vodka or ice water and knead 4 or 5 times, until the dough forms a rough ball. If the dough still does not come together, sprinkle in a little more vodka or water, 1 teaspoon at a time, until the dough comes together to form a shaggy ball.
- Flatten the dough into a squat disk, then wrap in plastic wrap and set in the refrigerator overnight (minimum 2 hours).
- Remove the dough from the fridge and whack it with your rolling pin a few times to soften the butter a little. On a floured surface, use a floured rolling pin to gently roll the dough to a circle about 1/8-inch thick. Don't roll too much, or you will overwork the dough. Work quickly and efficiently.
- Transfer the dough to a pie plate, but do not trim it yet. Set the pie plate in the fridge, covered with plastic wrap, for at least 2 hours (ideally overnight!).
- Trim the crust around the edge of the pie plate, allowing 1/2-inch of the dough to hang over the edge. Use your fingers to crimp the edges into an attractive style.
- Prick the bottom of the pie all over with a fork. Line the pie with foil, making sure it covers the edges to protect them from the heat. Fill with pie weights or dried beans. Bake the first time for 30 minutes.
- Remove the weights and the foil from the crust. If you will not be baking your pie again after you add the filling, bake the crust for another 20 minutes. If you will be baking the crust again once you add the filling, cover the edges of the pie crust with foil to protect them, and bake for another 10 minutes.
- Allow to cool completely before filling.
Notes
Nutrition
This content was originally posted on FearlessFresh.com.